|
|
Tutorials << InverterTutorial | Software Overview | Sitemap | Downloads | Developers | Forums |
|
|
Building an Inverter
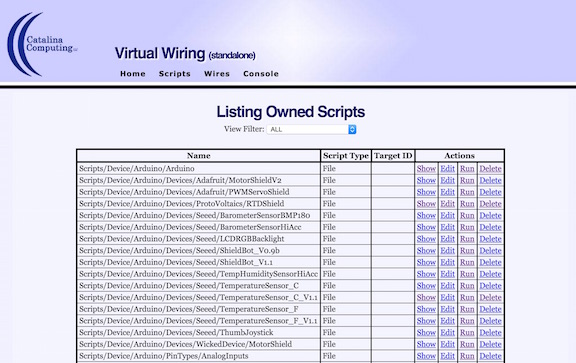
To see how the Virtual Wiring system works, we'll look at some examples. To get get familiar with the system, we'll start with a simple example - we'll build an inverter. An inverter is a digital device which outputs the opposite of what it sees on its input. It's a kind of Virtual Device, because you don't need anything outside of your computer to build one. That's good, because for this first example, you don't have to buy anything. Begin by starting up your Virtual Wiring system. Open your browser and click on the "Scripts" selector at the top of your screen. You should see something like this:
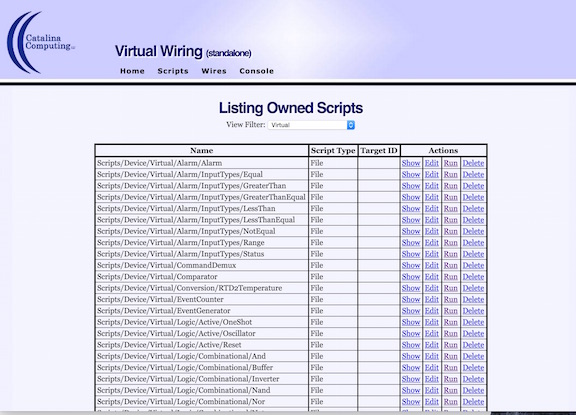
There are a lot of Scripts there, but somewhere on this page there's a Script for adding an "Inverter". You could use your browser's find function and look for "Inverter", but you can also use a filter. Filters help you find a type of device, when you are not really sure what it is called. At the top of the screen, right above the "Scripts" table, there is a "View Filter" selector. Click on the selector and select "Virtual", because we want to see all the Virtual Devices. Now you should see something like this:
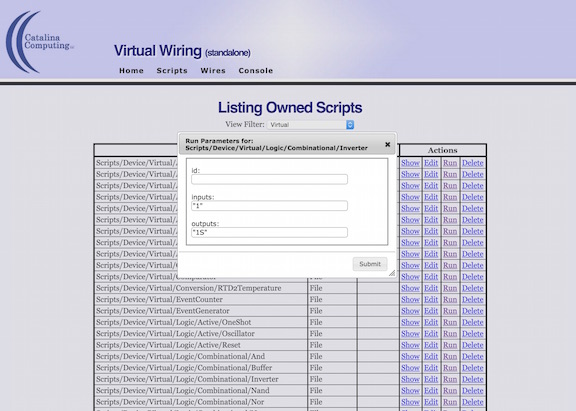
That's a much shorter read. Right in the middle of the table, there's row that says ".../Virtual/Logic/Combinational/Inverter". To the right of that, there's a box that says, "Run". Click on "Run", and you should see:
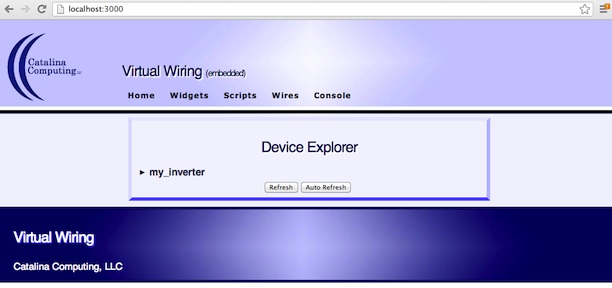
The dialog box is asking for Script parameters, one of which is the name for the inverter. Every device you add needs a unique name, so you can recognize it after you add it. There are also two other fields filled in for you, To give your inverter a name, type After filling in the "id" field, click on the "Submit" button. Next, click on "Home", at the top of your web screen. You should see your inverter.
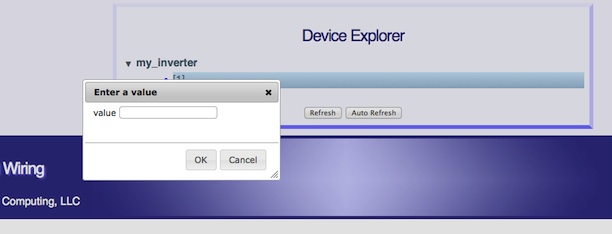
If you click on the expander to the left of "my_inverter", you can see two terminals on the inverter. They have the names we saw and left alone when adding the inverter. To see if the inverter works, use the expander to display the inverter's terminals and click on the "1" terminal (that's its input).
You'll get a dialog box asking for a value. In the dialog box, type
Notice that the "1S" terminal has an "off" value - it's inverting its input. Click on terminal "1" again and type Try changing the inverter's output (1S) value. You can change it by clicking on "1S" and filling in the dialog box (similar to the way you changed the input). Changing an output won't hurt anything, and your changed value will persist until the inverter changes its output. This device may not be all that interesting, but ons and offs are. Most devices in the Virtual Wiring system use ons and offs. That's because many devices are on/off type devices. If you know a little about digital logic, you could try adding "And" and "Or" devices and experimenting with them. Go to the next Tutorial to learn about wiring two inverters together. |
Catalina Computing, LLC.Copyright © Catalina Computing, LLC. (2013-2018) 
|
Page last updated: Tue Jul 14 22:58:56 2015 (UTC) |