|
|
Projects << OmniwheelBotProject | Software Overview | Sitemap | Downloads | Developers | Forums |
|
|
Omniwheel Bot ProjectEver tried using omniwheels? We learned about them from an article in Make Magazine. The article teaches you how to build a small bot using omniwheels. Unlike most wheeled bots, this one doesn't have to point in the direction it wants to go. It can move in any direction without turning. It reminds us of a crab - it can go forward, backward, left, right, and anything in between while facing in the same direction. In this project, we are going to build an omniwheel bot. We'll use many of the parts in the Make project, but we've made some changes which we think makes the bot both easier to build and more flexible. We'll start by building the bot. If you already have your bot assembled, you may want to go straight to the Running your Bot section. If you've got a running bot and want to program it yourself, go to the Programming your Bot section. If you want to enhance your bot with additional hardware, go to the New Hardware section Bot Overview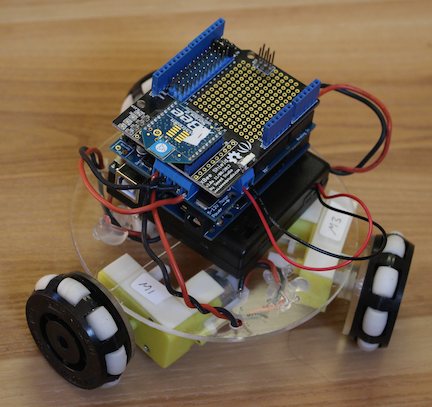
Here's a picture of our bot. It's pretty much like the one in the article. It's got 3 omniwheels with motors, a battery pack, and it's controlled by an Arduino and a motor controller shield. But there are some differences. We use a standard Arduino controller, instead of a Nanode, because it's easier to program (no need of an adaptor), has great documentation, and it's ubiquitous. And we use XBees for our wireless link instead of a model radio transmitter and receiver. XBees allow us to control our bot from a Mac, Raspberry Pi, or any other *nix based computer. Something you can't see, but will learn about here, is our bot controller application runs on our host *nix computer instead of in the Arduino. That makes it much easier to program and gives you a ton more flexibility in what you can do. Instead of having to put all your desired functionality into an Arduino's tiny little memory, you put it on your host and inherit all the capabilities of your host computer. We take advantage of our host's internet connectivity. Getting StartedBot Hardware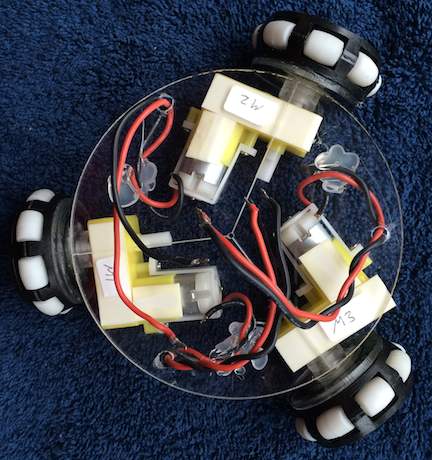
To get started, you'll need to build your bot. If you are a bot builder, you may have much of the mechanical stuff, though perhaps not the omniwheels. On the Wicked Device website, they have a hardware kit which has most of the pieces you will need. You'll still need 3 motors and a battery pack; Wicked Device has all these on their site as well. Their battery pack is a 5 battery pack. That's fine, your motors may run a little faster with the added voltage, but our bot runs just fine with 4 AA batteries. If you already have a 4 battery pack, you can use it instead. If you buy Wicked Device parts, assemble the wheels, motors and platform by following the directions in the Make Magazine article. The picture above is of the hardware kit plus the additional 3 motors. We labeled the motors, so we could consistently hook them up to the motor controller shield. At this point, you are done with the mechanical portion, and we are ready to work on the electronics. Our electronics will be a little different from what's in the article. Bot ElectronicsThe electronics for this project consist of an Arduino-compatible controller, a motor controller shield, and a wireless transceiver. On the Wicked Device site, they have a complete kit with both the mechanical and electonic components, but don't buy it if you want to build this project. ArduinoFor your controller, use an Arduino Uno Rev3. It's a great investment, because it's the gold standard for Arduinos. You'll be able to use it in lots of other projects, and if you have a problem, there's tons of information and people on the web to help you. Don't buy a "compatible"; in many cases they are just a little bit different. And if you have a compatible related problem (or you don't know), it's much harder to find help. You can buy Arduino Unos on the Web and in Radio Shack stores (in the US). Motor Shield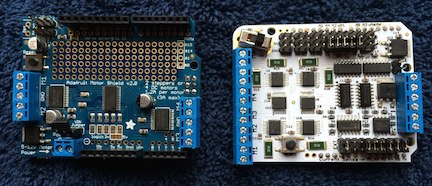
For your motor controller shield, there are lots available out there. Wicked Device makes one which is sold on the Maker Shed website. Maker Shed also sells a motor controller shield made by Adafruit. Maker Shed calls the Wicked Device motor shield MotorShield V1.1, and they call the Adafruit motor shield MotorShield V2. For this project, we support using either the Wicked Device or the Adafruit motor shield; we recommend the Adafruit shield. Why? The Adafruit shield is not entirely assembled. Isn't complete assembly a good thing? Not when it's built with one-sided headers. Both shields come with headers which allow the shield to plug into another, but they don't allow another shield to plug into it. Buy stackable headers and use them instead. If your shield's headers aren't already soldered in, just solder the stackable headers in; if the headers are already soldered in, you'll have to do some unsoldering. With stackable headers, you'll be able to put your motor shield underneath another shield (you'll see why this is important later). In the photo above, you can see we've used stackable headers on the Adafruit shield - the long, thin, black sockets running along the top and bottom of the board. XBee Wireless LinkThe last bot components you'll need to buy are XBees. XBees are what allow our bot to operate wirelessly. The XBee is a popular radio transceiver with a standardized footprint. When you're done with this project, you can find all kinds of other uses for them. XBees can function as a network, and they can also do a neat trick. They can mimic both ends of a serial connection wirelessly. One XBee can look like one side of a serial cable, and another can look like the other side. The two XBees communicate using a radio link, and all the radio complexities are completely hidden. They can have pretty good range, too (over a mile in some cases). So how does having a wireless serial cable help? Logically, our design consists of a host talking to an Arduino over a serial cable. Arduinos actually have USB ports, but when a host talks to an Arduino using its USB port, it talks to a software device that looks like a serial port. The software then turns the serial data into USB data and sends it to the Arduino. Meanwhile, on the Arduino, there's USB hardware which turns the USB data back into serial data and sends it to the Arduino controller's serial port. So both your host and your Arduino controller really are communicating as though they were connected by a serial cable. XBees replace the serial cable. There's a type of XBee that plugs into your host's USB port and looks like a serial port. There's another type that plugs into your Arduino board and taps into the controller's serial port. That's it - XBees replace your existing serial cable with a wireless one. This all happens without your host or your Arduino knowing they are wirelessly connected, and it happens without any additional wires (you loose one - the USB cable) or any additional coding. There are lots of ways to buy XBees and to make a wireless serial link. Minimally, we need an XBee that plugs into a USB port (something called an XBee Explorer), and we need an XBee shield that plugs into an Arduino (something called an XBee Shield). Our Arduino communicates with its host at 57600 baud, so our XBees will have to mimic a serial connection at 57600 baud. XBees are configurable for many different baud rates, and 56700 is one of them. 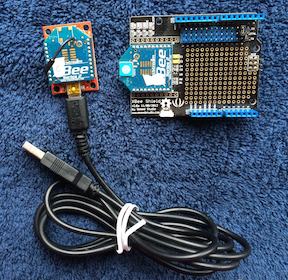
Buying the XBee ComponentsXBees have been around a long time, and there are many places you can buy them. Feel free to look around and buy where you like best. Here is a suggestion to get you started. SparkFun is a website with lots of project parts. They've got all the XBee parts you'll need to build your wireless link. Here are our suggestions:
When you start looking for these parts, you'll see there are many types of XBees. For more money, there is the Pro series; it's got a lot more range. For a bot like this one, the standard 1mW parts will give you plenty of range. If you want to buy Pros for use in some future project, you can use the Pros here as well. You'll see there are also Series 2 parts. They are a little harder to set up, but that's what we use; they can do everything the Series 1 can do, and they can also function as a mesh. If you are new to programming XBees, you might want to stick with the Series 1. Lastly, you can get different antenna styles. We've chosen XBees with their antennas integrated into the board; their range is good enough for most applications and they won't get in your way. If you choose to buy Pros, you'll probably want a better antenna. Configuring the Wireless LinkOnce you've purchased your XBees, XBee Explorer, and XBee Shield, you need to configure the XBees. XBees are configured by plugging them into the Explorer and running a program called XCTU. You can download it using the link provided. It runs on Macs and Windows PCs. To configure Series 1 XBees, Sparkfun has a good description. They use 2 Explorers, because it helps with testing. You can use your Shield as your 2nd Explorer and save a little expense, but you won't be able to do the tests they describe. You'll also need to swap your XBees, so each can be programmed on the Explorer. Sparkfun also has a good description for configuring an Explorer and a Shield, but you should read the first article as well. Once you have both XBees configured, set both XBees to 57600 baud. In the 2nd Sparkfun article, they tell you to flip a switch on the Shield to use the Arduino's software serial port. When you are done with the article, switch it back to UART mode. We need the XBee to talk to the Arduino's hardware serial port. To be safe, when the switch is in UART mode, don't connect the Arduino to a USB port (we'll be running it off battery power). Joystick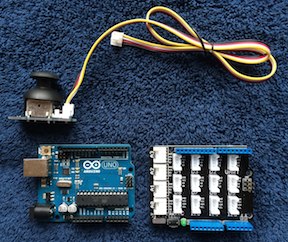
Our bot will be controlled by a joystick. The bot will move in whatever direction we point our joystick. The bot's speed will be determined by how far we push our joystick. Pretty intuitive. As a joystick, we will use a Grove Thumb Joystick. It plugs into a Grove Base Shield, which pugs into a 2nd Arduino. The Arduino will connect over USB to our host system. Parts ListAt this point, we've covered all the pieces you will need to build our bot. Here's the complete list.
Programming the ArduinosAs we've mentioned, our bot control code runs on our host computer, and not in an Arduino. But something has to run in our Arduinos. Instead, our Arduinos run a general purpose program which lets us tell them what to do in a general way. Things like: "set that pin high" or "generate PWM on that pin". Virtual Wiring uses this same code on all Arduinos, so you only have to program your Arduinos once. The code is often pre-installed on new Arduinos, and it comes with the Arduino Development kit; it's called Firmata. Both the Bot Arduino and the joystick Arduino need to be running Firmata software at a version of 2.3 or higher. To learn how to program your Arduino and install Firmata, see the How To Install Firmata page. AssemblyThe pieces will go together pretty simply. Most will just plug into one another. You will need a small Phillips screwdriver to connect the motor and battery wiring to the Motor Shield. We'll be using an Adafruit Motor Shield in our assembly. Bot AssemblyStart by placing your battery pack on top of your Bot Hardware. Next plug your Motor Shield into one of your Arduinos, and place the assembly on top of your battery pack. If you've labeled your motors, try to orient the assembly so that your motor wires don't have to go too far to get to the motor terminals on the Shield. 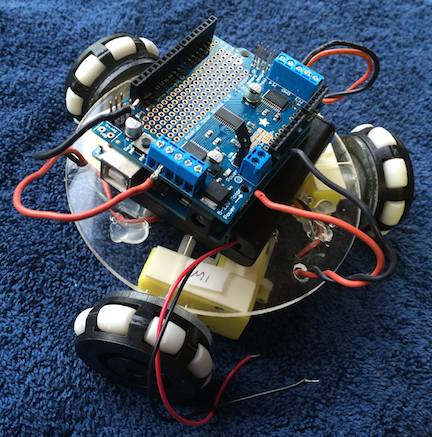
Next, we are going to wire the Arduino/Shield assembly to the battery and motors. Before connecting your wires, be sure the battery pack is switched off - you don't want to short something out. Connect up the 3 motors to the motor terminals for motors 1, 2, and 3. Our system assumes the motors are numbered in a clockwise direction (see hardware photo). When you wire your motors, it's not important what is plus or minus, but you have to be consistent across all 3 motors. Connect up the battery pack to the Shield's power terminals. You do need to be aware of the pack's plus and minus. If your pack has black and red wires, like ours does, red is plus and black is minus. If you can't tell, test the wires with a volt meter. Make sure you wire the battery plus and minus to the shield's plus and minus terminals. 
Both Shields have a way to power the Arduino from the battery pack; since our bot is wireless, its Arduino needs to get its power from the battery. The Adafruit and Wicked Device Shields both have a jumper for connecting battery power to the Arduino. Make sure the jumper is installed; then switch the battery on. Your should see lights on both your Arduino and your shield. Turn the battery off. That completes the bot assembly. Joystick AssemblyPlug the Base Shield into the 2nd Arduino. Plug one end of a Grove cable into the Thumb Joystick and the other end into the A0 connector of the Base Shield. That completes the Joystick assembly. 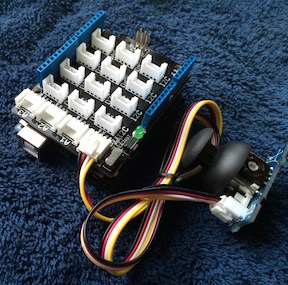
Running your BotNext we'll get your bot moving. We'll be running the bot from a *nix system (could be a Mac or a Raspberry Pi), and the bot program will be running on the *nix system as well. It makes for easy programming, as we'll see. To get started, go to the Running your Bot section. |
Catalina Computing, LLC.Copyright © Catalina Computing, LLC. (2013-2018) 
|
Page last updated: Tue Jul 14 22:58:56 2015 (UTC) |