|
|
Tutorials << StateMachineTutorial | Software Overview | Sitemap | Downloads | Developers | Forums |
|
|
Creating State MachinesState Machines are general purpose control devices in the Virtual Wiring system. Have a bunch of devices and sensors which need to be coordinated in a certain way? State Machines have user definable inputs and outputs and programmable functionality. They can function as stateless devices (like the basic combinational And, Or, Not devices), and they can also create and act upon their own state. A Design Problem - A DebouncerWe are going to create a State Machine which takes the noise of out a digital input signal. The idea is that if a signal sometimes jumps around before settling to its correct value, we want to filter out that jumping around. We only want the system to see the signal's value when it is stable. Sometimes, people call this kind of behavior, "debouncing". Debouncers are useful for all kinds of things. Perhaps you have a sensor which is sensitive to noise, and you want to ignore false signal values. Or maybe you have a power sensor in your home which turns on when you loose power. If you have a backup generator, it may take a few seconds for it to come on line, and then your power sensor will turn off. You might not want to know about the power failure unless it persists. Any time you have an on/off type signal which is only of interest when it is stable for a prescribed length of time, a debouncer can come in handy. The word "debouncing" comes from a solution to problem seen when switching digital signals through mechanical switches. When mechanical switches switch, they can bounce their contacts, and the bouncing contacts can create digital signals which bounce around as well. Since some digital devices are sensitive (in a bad way) to the bouncing around, people have created "debouncing" circuits for removing switch bounce. We are going to create a general purpose debouncer which can debounce most any kind of signal. The debouncer uses a State Machine. 
Fleshing Out the DesignA debouncer has an input for a raw signal and an output for the debounced signal. Debouncing requires knowing how long a signal is stable, so the debouncer needs a timer to measure the length of time the raw signal is stable. State Machines can create any function of their inputs and outputs, and they can create and react to state. However, they cannot measure time. State Machines have no notion of time. That doesn't mean that a State Machine is a poor choice for solving this problem - it's just going to need some help. Imagine we have an external timer, which every time it sees a signal transition from 
If we connect the "clk" input of a OneShot to our signal, we can tell when the signal is stable. When the signal transitions from Now that we've decided what Devices we will use for timing, we'll connect them all together. We connect our two OneShot outputs to our State Machine. We will call them "off2ons" and "on2offs". The signals are 
Designing Our State MachineOur state machine's job is to look at our two OneShot outputs and generate a "debounced" output. If either or both OneShot outputs are Let's see how our State Machine looks in a state diagram: 
We have 2 output states, There's a small problem with the state diagram, however. Though the state machine will faithfully debounce when it's in an We'll add a new state to our diagram called "uninitialized". When the state machine is in the "uninitialized" state, it will try to find a state for its output. When in this state, it will take the first value it sees on the "raw_signal" input and apply the value to its output. In this way, the output gets initialized. To support this initialization, we'll add an additional "raw_signal" input to our State Machine. 
Creating the State Machine TableTo build our State Machine, we will turn it into a table. The table will describe what is in our state machine diagram. State Machine tables are described here, so we won't go into their details. However, even if you haven't read about tables, tables are pretty easy to understand. We'll write our table in a description language called YAML (a human friendly language useful for describing many things, including our State Machine). Our State Machine will have 3 inputs and an output. One input is our "raw_signal" input. The other two inputs are "off2ons" and "on2offs". They are from our 2 OneShots, and they pulse high when our "raw_signal" input has Here is the table for our State Machine: With State Machines, the "" value, means the uninitialized value, or the value all State Machine inputs and outputs have at start up time. So
Though this table is a good reflection of the state diagrams, we can simplify it quite a bit. Since State Machine outputs hold their output state by default, there is no need to have statements which set outputs to the same values. We can get rid of all the state holding table entries. In addition, we don't need to include the state of the "debounced" output in our State entries. The next value for "debounced" is purely a function of which OneShot relaxes last. So we can get rid of the "debounced" state in our State statement. Here's a simpler version of the table. Note that this table has two additional small modifications. See the "State" statements used during normal operation? Instead of the simple "off" values shown in the state diagrams, the "offs" are bracketed with an additional "" value. Brackets in a State statement mean any of the values contained in the brackets. So we are telling our State Machine it can transition when its on2offs or off2ons state is either Why the modification? Looking at our state diagrams, we only move from the "on" to "off" state or "off" to "on" state when a OneShot turns Saving the TableWe need to save this table in a file, so we can use it in our State Machine. We will save it in our "Scripts/examples/virtual/state_space" subdirectory. The Scripts directory is in the "virtualizer" directory, and the "virtualizer" directory is a top level directory in our Virtual Wiring software release. The table file should have the name "debouncer_table.yaml". (There's a good chance you won't need to save this Script, as it is already there.) Building the DebouncerIn this section we'll build our debouncer. We'll build things using the Scripts page. Building the OneShot DevicesTo start, we'll create our two OneShots. Go to the Scripts page, and at the top of the page, click on the "View Filter" button. In the list of choices that follow, click on "Active". The Active filter shows only those Virtual Logic Device Scripts which are for active Devices (OneShots turn on reactively, but they turn off at a time of their own choosing). You should see a page which looks something like this: 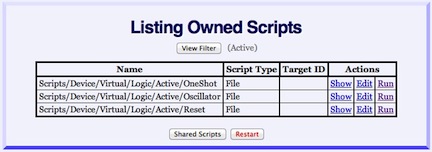
Click on the "Run" button of the OneShot Script. You will see a dialog box with "duration" and "id" fields. For the ID, we'll name the first OneShot "oneshot_off2on". In this example, we will ignore raw_signal values which persist for less than 10 seconds, so we'll set the "duration" field to 10. Your dialog box should look something like this: 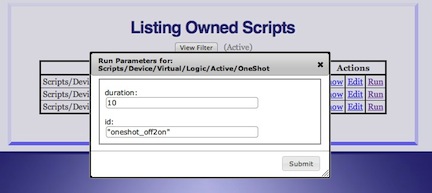
Click on the "Submit" button. Create a second OneShot with a duration of 10 seconds, but name this OneShot "oneshot_on2off". Building the Inverter DeviceSince the second OneShot will need its raw_signal value inverted, we need to add an Inverter Device. At the top of the Scripts page, click on the "View Filter" and select "Combinational". You will see a list of Combinational Logic Device Scripts. Click on the "Run" button of the Inverter Script. You will see a dialog box with "id", "inputs", and "outputs" fields. Type "raw_signal_inverter" into the ID field, "raw_signal" into the "inputs" field, and "raw_signal_" into the "outputs" field. Remember to quote all your values. 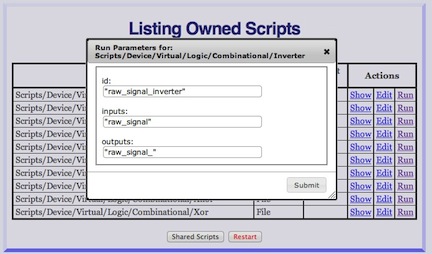
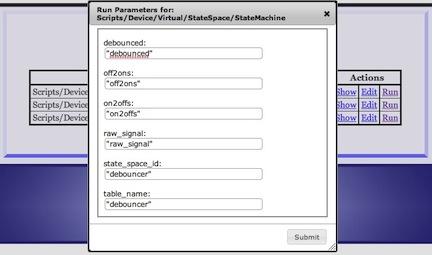
Building the State MachineBuilding State Machines is fully described here. We will follow the same procedure.
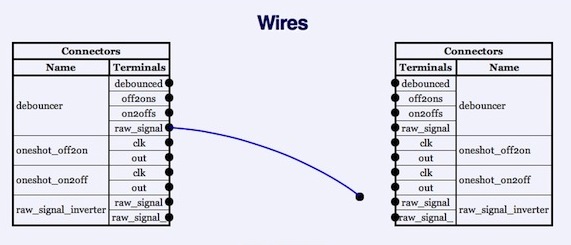
Wiring Things TogetherNow that we have created 2 OneShots, an Inverter, and our State Machine, we have all the Devices we need. Next we are going to wire them together. Go to the Wires page. You will see a "punchblock" view with two columns, each column containing all the Device terminals in the system. We are going to "wire" our Devices together by clicking on terminals in the left column and dragging them to terminals in the right column. Here we have clicked down on the "raw_signal" pin of our "debouncer" State Machine and are dragging a connection to the "raw_signal" input of our Inverter.
Looking at our block diagram, there are 4 wires interconnecting our Devices. We added a fifth wire when we modified our State Machine, so that it could initialize the "debounce" output after start up. The fifth wire connects the State Machine to the "raw_input" signal. Using the block diagram as your guide, draw all 5 wires. Here is the completed wiring for the debouncer with all 5 wires. 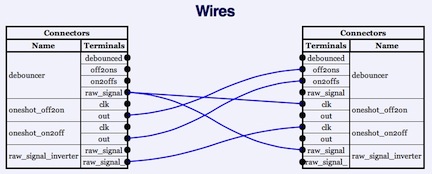
Testing Things OutOur design is complete. All we need to do is test it out. Go the the Device Explorer page, where you will see each of your Devices. If you click on your Device expanders, you can see each Device's terminals and their terminal values. Click on the expander for the "debouncer" Device. The "debouncer" has the "debounced" output we are interested in and the "raw_signal" input. Click on the "raw_signal" terminal of the "debouncer" Device. You will be presented with a dialog box for inputting
If you started by setting "raw_signal" to an 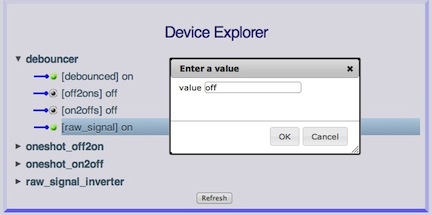
Saving the DesignIf you go to the Console page (or the Session Script page) and copy the lines which created our debouncer, you can put them in a Script. Running this Script will recreate the debouncer. We've created a "debouncer" Script in the "examples" area which does just this. Here is the debouncer Script (we've added some comments and spacing to make it easier to read). Wrap UpThis is a general purpose debouncing circuit. In your particular application, you may want to have different durations for your OneShots (you can even make your durations asymmetrical). Some debouncers only debounce Instead of changing the duration values in your "debouncer" Script and restarting your system, try: |
Catalina Computing, LLC.Copyright © Catalina Computing, LLC. (2013-2018) 
|
Page last updated: Wed May 16 21:28:39 2018 (UTC) |