Software Overview  |  Sitemap  |  Downloads  |  Developers  |  Forums
Small_clear_logo_llc

Creating Virtual Devices

Virtual Devices are generally easy to write, and let you create Devices which are fully customizable. They are pure programs, running entirely within the host computer. In this section, we will cover the methods available to Virtual Devices and show you how to create your own Virtual Device.

Virtual Device Programs

Virtual Devices are written in the Ruby language. A Virtual Device program is a Ruby module, which is a collection of methods contained in a namespace. To get started, here is an empty Virtual Device program - a module with no methods:

module VdExample

  private

  ###########################################################################
  # Private methods go here
  ###########################################################################

end # module

To be a useful Virtual Device, the module needs some methods. The few methods that all Virtual Devices implement are described in the module below.

module VdExample

  private

  #############################################################################
  # Main virtual device method for processing terminal events.
  #
  # When a terminal event occurs on the terminal of a virtual device,
  # the event is converted into a hash, where the hash key is the terminal
  # name, and the value is the value of the event on that terminal.
  # If the event value is a number, the terminal value is a numeric value.
  # If the event value is a method call, the terminal value is a string.
  # If the event value is a string, the terminal value is a quoted string.
  #
  # If the device returns a non-empty hash, the hash will be used to generate
  # values for terminals.  Similar to the input hash, the output hash keys are
  # the names of the output terminals.
  # If the output terminal value is a number, the value is a number.
  # If the output terminal value is a string, the value is a method.
  # If the output terminal value is a quoted string, the value is
  # a string.
  #
  # More than one input or output can be passed in at a time using the
  # input and output hashes.
  # If one does not wish to create any output events, return an empty hash.
  #############################################################################
  def respond_to_inputs(inputs, outputs = {})
    outputs # return result
  end

  #############################################################################
  # Define the terminals that this device uses.
  # Here we define 2 terminals named "in" and "out"
  #############################################################################
  def terminal_dids
    ["in", "out"]
  end


  ###############################################################################
  # Initialization routine - called first, when this module is extended.
  # Set up device defaults.
  ###############################################################################
  def self.extended(object)
    object.instance_eval do
      # initialization code goes here
    end
  end 

end # module

The main methods for a Virtual Device are shown in the module above. Virtual Devices have terminals, as do most devices, and a handler method for receiving events at those terminals. Any event arriving at a terminal will cause the handler method to be called. The handler function is called "respond_to_inputs".

The "respond_to_inputs" method takes one "inputs" hash parameter and one "outputs" hash parameter, and each hash holds terminal/value pairs, one for each terminal event. As explained in the comments, the keys of the hash are the terminal names, and each key value is the value that arrived at that terminal. The inputs hash will have one or more input events, and the outputs hash is available for returning any desired output events.

The "terminal_dids" method is the terminal device IDs method, or the method for returning the terminals of a Virtual Device. As you can see in the module, it returns an array of terminal names, which in this case are two terminals called "in" and "out". It is important that you implement this function, for without it, your Virtual Device would have no terminals.

The last method, "self.extended" is part of the Ruby language implementation, and it gets called when the Virtual Device module is extended into its Virtual Device. Think of it as an initialization function, which gets called before any other code in the module is executed.

The methods we have covered are enough to implement many kinds of Virtual Devices. Any Virtual Device which is synchronous is implementable using only these methods. A synchronous Device is a Device which is idle until it is called, and it goes idle again when it returns. Put another way, synchronous Virtual Devices are only active when they are called, and when they generate events, they come from the return value of the call. It is also possible to create asynchronous Virtual Devices

Here is an interesting, synchronous Virtual Device. Any quoted string sent to its "in" input will be sent as a command to the host computer. The Device will return the command result (quoted) on its "out" output. We don't include this Device in our Device library, because it's got two issues. First, it could be dangerous. If this device was in our Device library, a hostile user could add this Device to your happily running system and use it to snoop around or create havoc. Another more subtle problem is, depending on the command, it may block for a long time. A blocking command will block the calling thread, which will block the Virtual Wiring system, which is a bad thing (see "Dos and Don't Section" below). Still, it's a pretty powerful and interesting device, which could be a starting point for some other useful devices.

module VdCommandRunner

  private

  ##################################################################
  # Define so whatever is on the "in" pin is run as a command and
  # result is output on the "out" pin.
  ##################################################################
  def respond_to_inputs(inputs, outputs = {})
    if (command = inputs["in"]).kind_of?(String) &&
        (command =~ /^\"(.*)\"/)
      outputs["out"] = '"' + `#{$1}` + '"' # quote return value
    end
    outputs # return result
  end

  ##################################################################
  # Define our terminals
  ##################################################################
  def terminal_dids
    %W[in out]
  end

end # module

Creating a Virtual Device from a Module

When you have created your module, you are ready to create a Virtual Device which implements it. Here are the steps.

  • 1) Name the module and the file appropriately. The module name needs to be the camel-cased version of the file name, so the Device creation code can find the module. If your file is called vd_command_runner.rb, the module name should be VdCommandRunner.

  • 2) Place your module file in the same directory as the Virtualizer program. This allows the program to find your module file.

  • 3) Create a device using your module file. For the module we've been working on, enter the following into the Console (or inside a Script):

    add_device(type_file:"virtual_devices", module_file:"vd_command_runner", id:"command_runner")

  • 3) (alternate) Instead of using the line above for creating a Virtual Device, you can use the Virtual Device Script. It's in the Scripts/Device/Virtual directory and it's called VirtualDevice. It takes 2 parameters, "module_file" and "id". The following line creates the same Virtual Device:

    run_script("Scripts/Device/Virtual/VirtualDevice", id:"command_runner", module_file:"vd_command_runner")

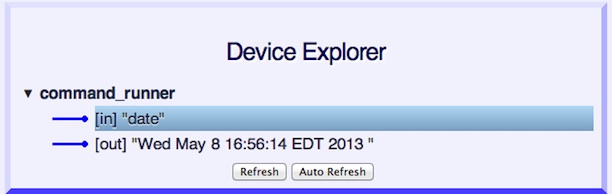
Typing out this alternative command won't save you any keystrokes, but you can find the VirtualDevice Script in your Scripts area and just run it. Then it will prompt you for an "id" and "module_file". That's a lot easier to remember, and that will save you keystrokes.

After step 3, you're done. Open your Device Explorer page, click on the "in" terminal of your "command_runner" Virtual Device and enter a quoted command string (e.g "date"). Look for the result on the "out" terminal (try refreshing the page, if you don't see any change).

Command Runner

Virtual Device Dos and Don'ts

Virtual Devices are programs, and the system doesn't have a lot of checks on what they can and cannot do. You, the programmer, need be sure your Virtual Devices behave properly.

  • Generally speaking, your Virtual Device should quickly perform whatever work it needs to get done and then return. It should not waste time in polling loops or running huge amounts of code. These activities will chew up many CPU cycles, possibly causing the system to get sluggish and degrade.

  • The Virtual Device code should never block (wait) for long. Devices all share the same event thread, so when your Device blocks, it blocks events to all the other Devices in the system.

  • Your Virtual Device code should be well behaved. All code running in the system runs at the same privilege level, so your code can do most anything. You can raise unhandled exceptions and call methods you've learned by poking around. You shouldn't, because you could destabilize your system. When interacting with the Virtual Wiring system, only use publicized methods.

  • Don't add in other people's Virtual Devices without first understanding how they work. Virtual Devices are programs and can do most anything. They could "phone home" with sensitive information stolen from your computer or many other things you might not like.

Creating Asynchronous Virtual Devices

If your Virtual Device has a need to wait on an event, generate events at times other than when it is called, or to run for long periods of time, you need to create an Asynchronous Virtual Device. For information about creating Asynchronous Virtual Devices, click here.

Catalina Computing, LLC.

Copyright © Catalina Computing, LLC. (2013-2018)


Page last updated: Tue Jul 14 22:58:56 2015 (UTC)