|
|
HowTos << HowToInstallFirmataOnArduino | Software Overview | Sitemap | Downloads | Developers | Forums |
|
|
HowTos << HowToInstallFirmataOnArduino | Software Overview | Sitemap | Downloads | Developers | Forums |
|
|
How To Install Firmata on an ArduinoBackgroundArduinos are electronic swiss army knives. They are inexpensive, tough (compared to other similar devices), they have lots of general purpose I/O (digital inputs and outputs), and they have specialized I/Os (analog inputs, PWM outputs, and I2C interfaces). There are literally thousands of different devices you can connect and control with them, and there are pluggable boards called "shields" which give Arduinos additional capabilities. If you are interested in building small control systems, you should know about Arduinos - they come in handy. Arduinos are fully programmable. Amidst all their I/Os, they have a processor with a RAM and a programmable non-volatile memory. It's a little computer complete with RAM and a little "hard disk" (the non-volatile memory). People write Arduino programs and download them into the non-volatile memory, and they just run, even after power cycling. If you are looking for a small stand alone system or for total control and flexibility, you can program Arduinos with your own specialized programs, one for every application. However, if you want your Arduino to act as an adapter between a general purpose computer and the many thousands of electronic devices Arduinos can talk to, you can download and run a single program just once - it's called Firmata. FirmataFirmata is open sourced, widely used, and has been around for years. It provides a software application interface for controlling an Arduino's I/O pins. So instead of writing programs and downloading one for every application, you download Firmata just once. From then on, your host tells Firmata what you want your Arduino to do. That's nice, because writing, downloading, and debugging Arduino programs can be a significant amount of work. The Virtual Wiring system uses Arduinos running Firmata - it's a system requirement. So you need to program all your Virtual Wiring Arduinos with Firmata - just once. Then they'll all just work. This HowTo shows you how to program Arduinos with Firmata. SetupTo program Arduinos, you need a host computer. Typically, host computers are PCs, Macs, and Linux computers. The host needs a USB port, because Arduino programming is done over USB. You will also need the Arduino Software. This is downloadable at the provided link. There are versions for Windows PCs, Macs, and Linux computers. At the time of this writing, version 1.6.5 is the latest release, so we'll be using that release in the examples below. Once you have downloaded the Arduino software, plug your Arduino into your host's USB port. Then run your Arduino Software. When you run it, it will look something like this: 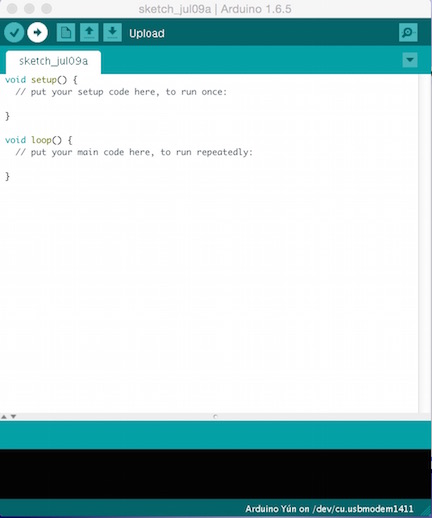
Notice at the bottom of our Screen, it says "Arduino Yun ....". We had actually plugged in an Uno R3 board, so we needed to adjust the board type. To do this, put the Arduino Software in the foreground (so its menus are available), and click on "Tools" > "Board:". Then select your board type (we selected "Arduino Uno"). Check the bottom of your screen; it should show the proper board type. Also at the bottom of the screen, after the board type and the word "on", you'll see the board's USB port. For us, it was "/dev/cu.usbmodem1411", which was correct. If you aren't sure and are using a *nix type system, go to a terminal session and type 'ls -lrt /dev'. Somewhere near the bottom of the listing, you should see your board's USB port. If the Arduino Software has the wrong port, click on "Tools" > "Port:". Select the proper port. You are ready to start programming. Load in the Firmata ProgramNext we'll load in the Firmata program. The Firmata program is included with the Arduino software, so all we have to do is select it from the Arduino Software files. With the Arduino Software in the foreground, click on "File" > "Examples" > "Firmata" > "StandardFirmata". You will get a new software screen with the software loaded into it. It will look something like this: 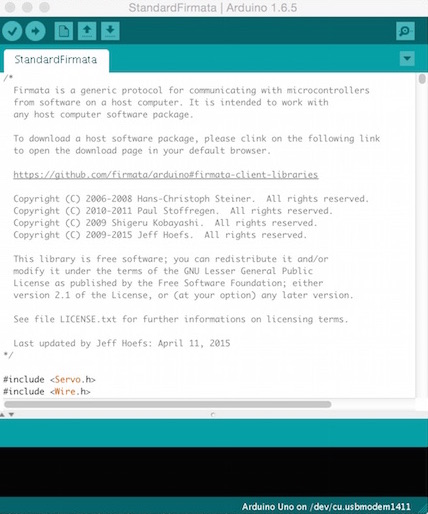
Let 'Er RipYou are ready to program your Arduino. At the top of your Arduino Software screen (not the menus we've been using, but the screen itself), there are 5 little icons. Let your mouse hover over each one for a moment to see what it does. Here we've placed the mouse over the first icon on the left. It's a check mark, and it shows up highlighted in white. It identifies itself as the "Verify" button. 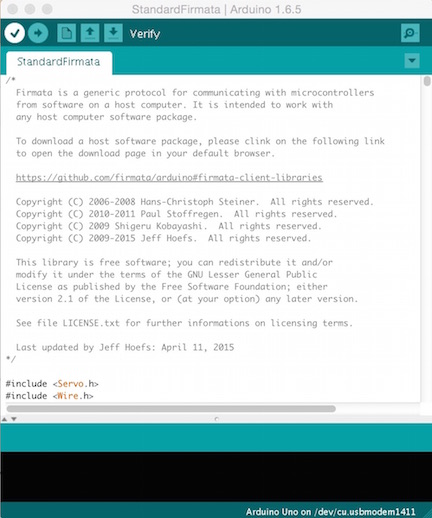
Click on "Verify". You'll see some messages telling you what is going on, and then a "Done Compiling" message. That's good, the Firmata software compiles. It should, because it comes with the Arduino Software and has been tested and is known to work. Now float your mouse over the the next button (looks like a right pointing arrow). You should see it identified as the "Upload" button. It loads the compiled and verified Firmata program into your Arduino. Click on it. After a short delay, it should say, "Done uploading". You've done it. Your Arduino is running Firmata. You can now use your Aruino in the Virtual Wiring system. Note: The Firmata Software in Arduino Software release 1.6.5 is version 2.4. Any Firmata software version equal to or greater than version 2.3 will run in the Virtual Wiring system. Firmata version 2.2 will also work, but it doesn't support Arduino peripherals which use the I2C bus. |
Catalina Computing, LLC.Copyright © Catalina Computing, LLC. (2013-2018) 
|
Page last updated: Tue Jul 14 22:58:56 2015 (UTC) |