|
|
Recipes << XBeeTextingIntruderAlertRecipe | Software Overview | Sitemap | Downloads | Developers | Forums |
|
|
Recipes << XBeeTextingIntruderAlertRecipe | Software Overview | Sitemap | Downloads | Developers | Forums |
|
|
Recipe for an Intruder Alert System Using Text/Email MessagesThis Recipe demonstrates how to use an XBee Digital I/O adapter and a motion sensor to create an intruder alert system. The system sends alerts using text/email messages and responds to text/email messages. Each time a message is sent to the system, it will be acknowledged with a return message, so the sender knows what happened. IngredientsFor this Recipe, you will need:
This Recipe uses a standard 4 wire, 12 volt motion sensor. These units are used in many home and business alarm systems. They are readily available on Amazon and EBay, as well as many other sources. The motion sensor is monitored by an XBee Digital I/O device. The Digital I/O, or DIO for short, is a general purpose wireless device which can both monitor digital inputs and generate digital outputs under radio control. It also can supply 12 volts of power, which comes in very handy. Many sensors are designed to run from 12 volt supplies. The motion sensor will receive its 12 volt supply voltage from the 12V power supply terminals of the DIO. The motion sensor's sense output will be monitored by a DIO input terminal. Most of the DIO configuration will be done by the Script in this Recipe, but the DIO's 12V output terminal and its motion sensor input terminal need some manual configuration. On the back of the DIO there is a set of DIP switches. In the XBEE DIO documentation, there is a description of the function of these DIP switches. Set the switches so the 12 volt output function is enabled, and input terminal 1's pullup resistor is activated. Once you have set the DIO's DIP switches, you need to wire the motion sensor to the DIO. Using a 4 wire cable, connect the DIO's 12 volt and ground pins to the power and ground pins of the motion sensor. Next connect the motion sensor's normally closed (NC) switch pins (2 signals), to the ground and pin 1 (a sensing pin) of the DIO. Electrically, this will make the motion sensor normally ground pin 1 and let it pull up high when the sensor senses motion. It also has the handy side effect of signaling an alarm condition if the sense wires are disconnected for some reason. The photo below shows a DIO wired to a motion sensor. 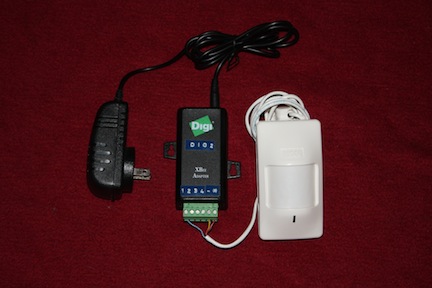
Before installing the DIO, inspect the DIO case until you find its serial number label. It often has a barcode on the back, and the barcode has a string underneath that begins with "SN:(S)". The serial number follows the "SN:(S)" and is a string with the digits 0-9 and the letters A-F. The serial number is a 16 digit (64 bit) hexadecimal number (a number in base 16). Write the serial number down, as you will need it for this Recipe. Plug the DIO power supply into an electrical socket where you wish to sense motion and plug the power supply's power plug into the DIO. Plug the XStick into a USB port on your host computer. Keep the XStick and the DIO less then a few tens of feet apart to begin with, as the two are wireless devices and can get out of range. Once you have things working, you can experiment over greater distances. You need an email account to which you can send messages to via SMTP and receive from using POP. Most email accounts support SMTP and POP interfaces. If you look on your provider's support page, you should find addresses for sending and receiving messages such as "smtp.provider.com" and "pop.provider.com". Once you know these addresses, you can use your account name and password to send and receive messages. The address where your messages will be sent can be any email address. It can also be an email address for a text message (see the Email Addresses for Texting section). You can add additional addresses using the addEmailAddress Scripts. Unlike configurations which only send messages, this Recipe can receive and respond to messages as well. Receiving requires that the Recipe poll your email account for email. Don't use an email account which has email you wish to keep, or which is receiving email you wish to read. When this Recipe picks up the mail, it cleans out the mailbox. It will act upon messages from users it recognizes, but all the messages it receives will be deleted. ScriptHere is the Script you need to run for this Recipe: To run this Script, you need 9 parameters: coordinator_port, dio_address, pop_host, smtp_host, smtp_port, ssl_enable, user, password, and messaging_address. The dio_address parameter is the serial number of the Digital I/O. To convert the serial number to the dio_address parameter, strip any leading zeros from the serial number and replace them with "0x". The coordinator_port parameter is the name of the USB port of the Coordinator. On *nix hosts, the USB port name is in the "/dev" directory. To see the devices in order of their creation, type "ls -lrt /dev" at a shell prompt and look near the bottom of the list for your Coordinator's USB port. The pop_host is the name of the POP server hosting the email account, and the smtp_host and smtp_port are the name and port of the SMTP server hosting the email account. ssl_enable determines whether SSL will be used when talking to the server. The user parameter is the user name of the email account on the server and the password parameter is the password for the email account. The messaging_address is the email/texting address of the device that will be receiving alert messages and controlling the system (typically a text messaging device or the email address of a smart phone). As an example, for a Coordinator at USB port "/dev/cu.usbserial-00002006" and a Digital I/O with serial number "0013A200406B0263", an email server using SSL with name "email_server" with an email account of "user" and a password of "secret", and a controlling device which is a Verizon cell phone with phone number 111-555-1212, the Script parameters are:
Running the ScriptRun the Script above with your own parameters (remember, if you make a mistake, you can edit what you've done on the Console page). Go to the Device Explorer, click on the DIO's "1S" terminal, and enter This Recipe uses a Wired Messaging POP Device. The Wired Messaging Device supports multiple outputs and inputs, so we can control multiple devices with it. In order to tell the Device which output terminal we are addressing, messages to the Device have 2 values - a terminal name and a value. To reset the alarm, send a message back to the device that looks like this: Depending on your polling interval (4 minutes in this Script), it may take a few minutes for this command to take effect. You should get a message that looks like this: The alarm Device will also self reset after 1 hour (3600 seconds) as defined by the Script. Try sending something to a nonsensical output terminal. For example, send the message: Enjoy using your alarm system with your email/texting device. |
Catalina Computing, LLC.Copyright © Catalina Computing, LLC. (2013-2018) 
|
Page last updated: Tue Oct 13 12:59:08 2015 (UTC) |