|
|
HowTos << HowToInstallVWOnArduinoYun | Software Overview | Sitemap | Downloads | Developers | Forums |
|
|
How to Install Virtual Wiring on an Arduino Yún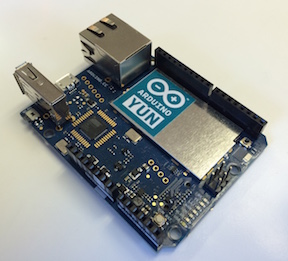
We are going to install Virtual Wiring on a tiny board called an Arduino Yún. When you are done, you'll be able to use your Yún as an Arduino enabled Virtual Wiring system. It will run all the Virtual Wiring Virtual Devices (State Machines, Logic devices, Alarms,Timers) as well as devices that connect to Arduinos. And because you are using Virtual Wiring, you won't need to do any programming (but you can if you want to). BackgroundThe Arduino Yún is an Arduino sized board with the familiar Arduino microcontroller plus a 32 bit MIPS processor. The microcontroller and MIPS processor communicate using a bidirectional serial interface. Together they behave like an Arduino Uno and a small Linux system cabled together with a USB cable. On a single Yún, one can run sophisticated systems (like Virtual Wiring) and have all the I/O capabilities of the Aruino Uno. The Yún microcontroller has a USB programming port (like all Arduinos). The microcontroller is compatible with the standard controller used on Ardunio Unos and its cousins (Megas, Leonardos, Decimillas, etc.). The Yún MIPS processor has 64 megabytes of RAM, an Ethernet port, WiFi, a USB port, and a micro SD slot. The processor runs a Linux variant called OpenWrt, which is often found in routers and other embedded Linux systems. OpenWrt is designed to run on small systems with limited memory and storage, and the OpenWrt Linux that comes with the Yún (OpenWrt-Yun) has just a fraction of the applications included in a regular Linux system. Unfortunately, Yún only has a small amount of program storage available (16 megabytes), and its 64 megabytes of RAM is also small (by today's standards). This will lead to some challenges which we'll address and overcome. When this HowTo is complete, your Yún processor will be running Virtual Wiring, and your Yún microcontroller will be available for all kinds of I/O operations, just like any other Virtual Wiring system with an Arduino peripheral. You'll have full control of all the familiar Arduino I/O pins, and your system will be networked via Ethernet, WiFi or both. And everything will be running on one tiny board. Getting StartedThe Yún comes with a small Linux system installed in its onboard flash - OpenWrt-Yun. Make sure your Yún has the latest OpenWrt-Yun version. How to upgrade your software is described here. For this HowTo, we are using software version 1.5.3. The Yún designers don't recommend using Yún's flash for anything other than OpenWrt-Yun. The flash only allows a limited number of writes, and it's only 16 megabytes in size - not big enough to store much more than OpenWrt-Yun itself. Before installing any software, you'll need to add additional storage. To create more storage, you need a micro SD disk. These days, micro SD disks don't come much smaller than 4GB, and any micro SD 4GB disk (or larger) is plenty large enough to hold all we'll need to run Virtual Wiring. With your micro SD disk in hand, visit the "How to expand the Yún disk space" web page to learn how to create more storage for your Yún. In the example, they create a shared DOS partion which is 700MB in size and use the rest for a Linux partition. That will be more than enough for what we are doing, with plenty to spare for other projects. Installing FirmataFor Virtual Wiring to take full advantage of your Yún, we need to download a program to your Yún's microcontroller. The program, Firmata, lets the Yún's Linux processor control the microcontroller's I/O, so the Linux processor can control and monitor whatever devices are wired up to the Yún's I/O terminals. If you hook up LEDs, switches, sensors, whatever to the Yún, Virtual Wiring will be able to talk to them. To install Firmata, we use a separate host computer (Mac, PC, Laptop, ....). First, we install the Arduino software on the host. Then we compile Firmata on the host and download it to the Yún microcontroller. If this sounds tricky, it's not meant to be. The details of how to do this are here. A Couple of Things You Need to Know about YúnsThe Yún's microcontroller is slightly different from an Uno's, so there's a Yún specific version of Firmata. Compile and download the "StandardFirmataYun" program, not the "StandardFirmata" program called out in the HowTo link above. If you compiled and downloaded the wrong program by mistake, just load in the "StandardFirmataYun" program and compile and download again. The "StandardFirmataYun" program is in the same "Firamata" directory as the "StandardFirmata" program. When downloading to the Yún, connect your host to the Yún using the Yún's micro USB port. The full size USB port is for attaching slave devices and won't work as a programming port. Adding Additional Linux ApplicationsNow that we've added gigabytes of additional storage to our Yún, it's time to add some software. OpenWrt-Yun uses a package manager called "opkg", so we'll be using that to add the software. Make sure your Yún is connected to the internet (either via Ethernet or WiFi). Before installing your software, be sure opkg knows about all the latest software. Open a terminal on your Yún (we use ssh to talk to our Yún), and from within your terminal type: We are going to be adding Ruby (the language Virtual Wiring is written in), the unzip utility (we'll need it to decompress the Virtual Wiring Zip file), and coreutils-stty (for initializing the serial port which talks to the Yún microcontroller). To install Ruby, type: The command will download the necessary Ruby files and install them on your Yún. To install unzip, type: And then install the stty utilities: Your Linux software is ready to go. Free Up the Serial PortWe need to free up the serial port shared by the Yún microcontroller and the MIPS processor (for Firmata), because by default, the Linux kernel uses it as a serial terminal. To free up the port, we modify the /etc/inittab file. In that file, there's a line that looks like: Comment out the line by putting a '#' character in front of it so it looks like this: Now the Linux kernel won't try to use the serial port. Reboot your Yún ('sudo reboot'), so the updated inittab file takes effect. Installing Virtual WiringAll that's left is to do is install Virtual Wiring. Go the the download page, read the licensing agreement, and if you agree (if you aren't planning on selling this project, there probably aren't any issues), download the latest version of Virtual Wiring software. You'll need to install the software on your Yún, which means you need to put the zip file on your Yún's disk, if it's not there already. We downloaded our software onto a laptop, and then scp'd it over to the Yún (scp is a secure copy program which works with Yúns). If your Virtual Wiring software is called vw_application_xxxxxxxx.zip, and it's in your current directory, type (from your laptop, PC, ...): Where you see <Yún's internet address>, type in your Yún's network address. (If you are using ssh to talk to your Yún, the ssh address is the one we want. If not, type 'ifconfig' within your Yún terminal, and it will show your the Yún's Ethernet and WiFi internet addresses.) After running scp, you will get prompted for a password; type your Yún's root password, and then the file will be copied to your Yún. Note: instead of using scp, you could have powered down your Yún, removed its micro SD disk, and copied Virtual Wiring to the DOS partition of the disk. Either works, though using scp is quicker. Once you have the Virtual Wiring software on your Yún, move it to a directory where you want it installed (we created a directory called "vw" in our login directory and put the software there). Then go to your directory and type: You'll see the files being unzipped. Then you're done. Virtual Wiring is installed. Running Virtual Wiring on Your YúnAll that's left to do is run Virtual Wiring. Because of the Yún's limited memory (64 megabytes), we are going to run Virtual Wiring a little differently. Normally, our host computer runs all the Virtual Wiring control software, and it runs a web server. The control software supports all our devices, and it handles all the virtual wiring. The web server lets us configure and monitor the system. Unfortunately, there's not enough memory on a Yún to do both, so we will be running the control software on the Yún, and the web server on another remote host. To get the Yún to just run the control software, we are going to dig a little deeper into the Virtual Wiring software. In a terminal session with your Yún, go to the top level directory where you installed Virtual Wiring and type: Now we are inside the directory with just the control software. The control software talks to the web server using a network protocol called DRb (Distributed Ruby). Instead of running the protocol between a server and a controller all on our Yún host, we are going to run it across a network between a remote Virtual Wiring web server and a controller on the Yún. First, we tell the control software what port to use (here well pick port 5555). From your Yún's terminal session type: Next we run the control software: Your control software is running on your Yún. Running the Virtual Wiring Server on a Remote HostNow we'll install the web server on your remote host - a laptop, Mac, or whatever computer you've chosen to run the server software. Download the Virtual Wiring software to your remote host and go through the normal installation process. Stop after the software is installed (before you've run it). Since we are only running the web server on your remote host (and talking over your network to your Yún's control software), we'll start up the remote host a bit differently. Normally, you'd go your host's installation directory and type: "./run_vw_application.rb". This time, we'll run the program with a slight variation. In Virtual Wiring software versions 1.8.0 and later, there's a hidden option called "--remote_virtualizer". It tells the Virtual Wiring application that the control software is not running on this machine, but on another (remote) machine. Because we are running the control software on our Yún over DRb on port 5555, we start Virtual Wiring on the remote host by typing: Where you see <Yún's internet address>, type in your Yún's address on your network. Open a browser on your webserver (remote host) and go to "localhost:4567". Take a look around. The web pages you'll see are the pages displayed by your server (localhost), but they are populated by the information supplied by your Yún! Testing Things Out - Building Our First SystemLet's get the Yún to do something. Your Yún can now create Virtual Wiring Devices and wire them together, just like any other Virtual Wiring system. To see this, we'll run one of the pre-written example Scripts. From your remote host's browser, go to the Scripts page. Click on the View Filter at the top of the page and select "examples". Within the example Scripts, there's one called "Scripts/examples/arduino/blinking_led.script". Click on its "Show" action, to see what it does. You can see it blinks the Arduino LED on pin 13. Go back and run it. When it asks you for the "arduino_port", use the port that communicates between the Yún's MIPS processor and microcontroller ("/dev/ttyATH0"). There's also an "osc_period" parameter; you can change it, but don't make it too short or your Yún may not be able to keep up. After running the Script, the little LED on your Yún (ours is red) should start blinking. Hint: if your Script doesn't run successfully, try pressing the Yún's 32U4 reset button, waiting, and running the Script again. 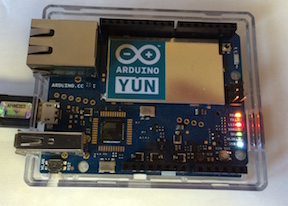
Stop the web server on your remote host (a control-c within the terminal session where you started up Virtual Wiring will stop it). Notice that the Yún's LED is still blinking. Once the control software is configured and running, it doesn't need a server, so it keeps right on blinking whether the server is there or not. Start up your server again. Once again, you can see the state on the Yún. You can also make changes. Go to the Scripts page and restart the Yún control software. The LED stops blinking, and the Explorer page is now empty. Go the the "examples" Scripts again and rerun the blinking LED script. Running the Yún Control Software as a DaemonNow that we know how to run our control software on our Yún, let's find a way to run it without having to keep a terminal screen open. That way, our Yún can run Virtual Wiring standalone. In the previous section, we ran Virtual Wiring by running "./run_with_retry.rb ./virtualizer.rb virtualizer_standalone.config" from the command line. We had to keep the terminal session open, because closing it would have shut down the program. The following shell script will put the program in the background and redirect its output, so it will keep running even after the terminal session is closed. Copy the lines above and put them into a shell script in the virtualizer directory called "daemon_virtualizer.sh". Make the script executable ('chmod +x daemon_virtualizer.sh'), and run it from the command line. Your command prompt comes right back, but your control program keeps running. You can now log off your Yún, and Virtual Wiring will keep on running. Give your Yún 30 seconds or so to self initialize before taking a look at it with your browser. IdeasNow that we've got our Yún running, let's find some good uses for it. How about a remote temperature monitor? Plug it in, connect it to Ethernet or WiFi, and you can monitor temperature wherever it is. Your home, your basement, your garage? We've built ours using a Grove Base Shield and a Grove Temperature Sensor. 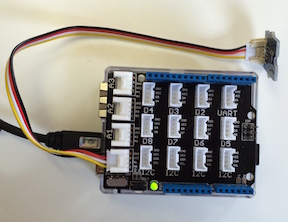
Note: before plugging the Base Shield into your Yún, put some electrical tape on top of the Yún's Ethernet and USB connectors. The Base Shield has soldered pins which mustn't make contact with the metal connectors on the Yún. Configuring the SensorUsing Virtual Wiring, we run the Scripts/Device/Arduino/Arduino Script with the following parameters: Notice we set the "analog_sample_period_ms" parameter to 5000 milliseconds (5 seconds). We did that so our Yún wouldn't overexert itself - no need to sample temperature any faster. Next we run the Scripts/Device/Arduino/Devices/Seeed/TemperatureSensor_F_V1.1 Script with the following parameters: We needed to use the V1.1 version of the Script, because we were using version 1.1 of the sensor. Since the sensor is plugged into the A0 connector of the Base Shield, we set the pin parameter to "A0". Browsing from our remote web server, the "temperature" terminal on the "arduino" Device has the temperature in Fahrenheit! 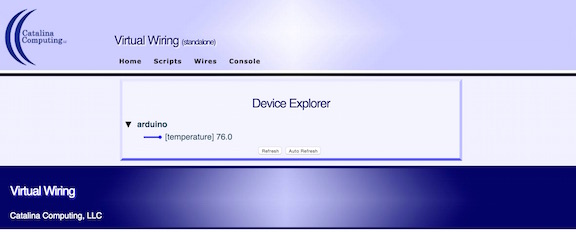
Add EmailingWith an Alarm Device and a TextMessagingPOP Device, your Yún could send you text or email messages when temperatures were out of range. |
Catalina Computing, LLC.Copyright © Catalina Computing, LLC. (2013-2018) 
|
Page last updated: Wed Jul 22 21:10:17 2015 (UTC) |