|
|
Projects << OmniwheelBotProject << OmniwheelBotRunning | Software Overview | Sitemap | Downloads | Developers | Forums |
|
|
Projects << OmniwheelBotProject << OmniwheelBotRunning | Software Overview | Sitemap | Downloads | Developers | Forums |
|
|
Running your Omniwheel BotGetting StartedWe'll be running the bot using the Virtual Wiring system, so download and install Virtual Wiring on a suitable host, if you haven't already. If you have one available, we recommend starting with a PC Linux or Apple OS X based host. These hosts have the best response times and will speed up your testing. Later, once you have everything running, you can use slower, smaller hosts (Raspberry Pis, etc.). Once you have Virtual Wiring running on your host system, you can plug in the USB cables for controlling your bot and your joystick Arduinos. Initially, to keep things simple, we will not use wireless control. Instead, we'll plug the bot Arduino into your host system directly. Once we've seen the non-wireless version of the system work, we'll replace the bot's USB cable with a wireless connection. Isolate the ArduinoBefore plugging the bot's Arduino into your host system, we are going to take a small precaution. We are going to isolate the motor power supply (the batteries) from the Arduino power supply. On your motor shield, there is a jumper which connects the Arduino's power supply to the battery. Normally, we want the battery to power the Arduino, but for our test system, we will power our Arduino over USB. Remove the power jumper on your Motor shield (the VIN jumper on the Adafruit Shield, the EXT jumper on the Wicked Device Shield). Leave it off until we tell you to put it back on. Discover the USB Port NamesPlug your bot's Arduino into a free USB port on your host. From a command line on your host type: Plug your joystick's Arduino into your host system. Do the same experiment to find out its USB port name. Write that name down and leave the 2nd Arduino plugged in as well. Your hardware is hooked up and ready to go. Starting Up Your BotWith your USB device names in hand, you are ready to run your bot. Open a web browser and navigate to your Virtual Wiring system's home page. If you are running your browser on the same host as your Virtual Wiring system with its default settings, the home page will be at "localhost:4567". On your Virtual Wiring System, navigate to the Scripts page by clicking on "Scripts" at the top of the page. Using the Scripts Page's View Filter, select "projects". With the "projects" View Filter, it narrows the number of scripts we have to look at considerably. Depending on whether you have an Adafruit Shield or a Wicked Device Shield, click the "Run" action for either the "adafruit_startup.script" or the "wickeddevice_startup.script" Script file. 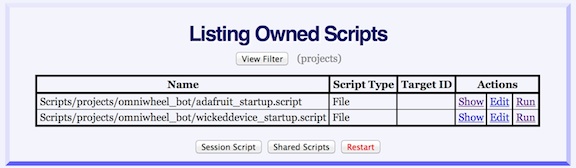
After clicking the Run action, you should see the Run screen for your shield. Here we show the screen for a bot with an Adafruit Shield running on a MacBook. 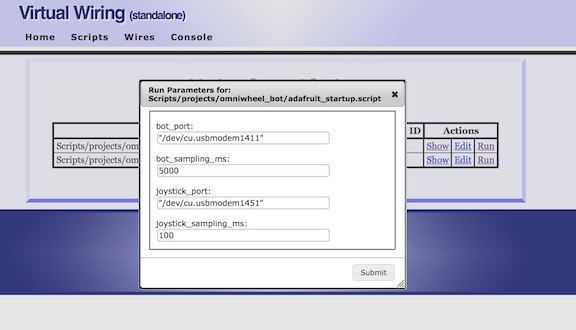
You will need to substitute your own bot_port and joystick_port values. These are the USB port names you have have just learned. You can leave the other values as they are.
Click the "Submit" button at the bottom of the screen. Wait a few moments, and you should get an OK message. While holding your bot (you don't want it to drag off your host), move your joystick around. Your wheels should start spinning. It's alive! Possible ErrorsIf you get an error message, here are some things to try.
Remember, whenever you make a mistake and want to restart your system, hit the "Restart" button at the bottom of the Scripts page first. Restarting will clear out your system so that it starts fresh. Tip: if you have already run your Script once and don't feel like going through the run screen each time you rerun the Script, use the Console. The Console lists whatever you've done. Just put your cursor at the end of the line you want to rerun and hit return. If you want to change what you've run a little bit, you can edit the line before rerunning it. Setting Your Bot FreeWe are almost done. All we need to do is replace the USB cable going from your host to your bot with a wireless one. If you've configured your XBees, this is pretty simple.
You are wireless! Put your bot on the floor and let 'er rip! ProblemsScript failed to run?
No Power
Works, But Occasionally Wanders Off Out of Control
Further StudyWant to learn more? Your bot is controlled by a Ruby program on your host. You can change the way it functions. To learn more about programming, go to the Programming your Bot section. Both your bot's Arduino and your joystick's Arduino have a bevy of I/O pins suitable for sensing and control. You can add bot sensors, a second joystick, bot lights, pretty much anything you can think of. Go to the Adding New Hardware section for ideas and suggestions. |
Catalina Computing, LLC.Copyright © Catalina Computing, LLC. (2013-2018) 
|
Page last updated: Wed May 30 03:12:31 2018 (UTC) |